Thursday, August 27, 2009

King Kong Pays A Visit To My Studio

When filmmaker Eric Kessler came to my studio to pick up the miniature Skull Island wall and altar I had worked on he brought along a special guest -- King Kong!

I had often admired Kessler's stop motion puppet from afar. Watching as Kess put Kong through his paces dispatching his stop motion adversaries on YouTube: YouTube - Kong vs. Spinosaurus

As good as the YouTube footage is it doesn't come close to doing this unique piece of articulated artwork justice!

Getting to examine Kong close up in my own hands was a great treat. Kess and I concluded the visit by having some fun posing Kong attacking the Skull Island gates for a few pictures.

Wednesday, August 26, 2009

Painting The Skull Island Altar

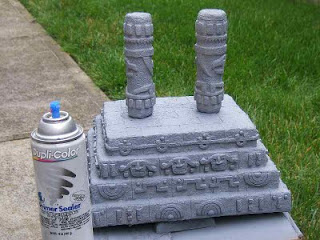
After finishing adding the carvings to the altar it was time to prime it for painting. I used the same grey spray primer on the altar that I used on the Skull Island wall.

When the primer was dry I began dry brushing acrylic paint on the altar to bring out the hilites.

An application of thinned down acrylics was brushed on and then wiped off with a soft cloth. It tied all the colors together and accented the cracks and crevices.

I allowed the wash to dry overnight and then sprayed the entire altar with a light coat of Krylon Matt Clear to protect the finish. I then used a 50/50 mix of water and white glue to add bits of moss to the altar.

Tuesday, August 25, 2009

Ornamental Carvings On The Skull Island Altar

I sculpted four of the ornamental carvings that decorate the miniature altar. From these originals I made one piece latex rubber push molds.

Using Super Sculpey polymer clay in these molds I was able to create multiples of the carvings I would need to adorn the altar.

Starting at the top of the altar I applied a veneer of Apoxie Sculpt clay.

I textured it to match the stone work I had done on the Skull Island wall.

When I was finished I carefully pressed the baked Super Sculpey carvings into the wet Apoxie Sculpt clay. When the clay had cured I moved on to the next tier of the altar.

Monday, August 24, 2009

Skull Island Altar Pillars

The Styrofoam I had added to the sides of the original altar to enlarge it was covered with a layer of mache. The mache gives the Styrofoam some strength and also acts as a sealant.

I sawed off the old pillars in preparation of replacing them with taller, thicker pillars.

After inserting a hardwood dowel in a block of Styrofoam to act as a handle I proceeded to shape the pillar with a rasp. When I got it to the approximate shape I was looking for I began covering it with water base stoneware clay.

The carving was done with miniature wire loop tools.

Friday, August 21, 2009

The Skull Island Altar

One of my favorite scenes in King Kong (1933) is Kong looming over the sacrificial altar to claim his "bride".

I recently had the opportunity to recreate this altar in miniature. The miniature was going to be used in a stop motion prequel to King Kong by animator Eric Kessler.

He supplied me with the altar he had made and asked me to make it match the miniature Skull Island wall I had worked on.

The first thing I decided to do was to enlarge the altar by adding Styrofoam to the sides.

Thursday, August 20, 2009

Skull Island Wall Completed

Once I had finished painting the wall I sprayed it with two light coats of Krylon Matt clear to protect the finish. Working on the wall was definitely an interesting project but I was glad to have finally finished it!

Next up I'll be making a miniature sacrificial altar to match the wall.

Wednesday, August 19, 2009

Staircases Added To The Skull Island Wall

After I had painted and antiqued the staircases I positioned them in front of the wall to take some photographs. I shot one in B&W to see how it would look.

Tuesday, August 18, 2009

Adding Moss To The Skull Island Wall

Finding moss to add to the top of the Skull Island wall was difficult. The moss at the arts and crafts store was too large. The stuff I found at the model train store was in much too small of a scale.

I opted for the moss from the crafts store. I chose three shades of green moss and a brownish colored moss. By tearing it with my fingers and finely cutting it with scissors I arrived at a size of moss that would be in scale with the miniature wall.

Next I cut sections of burlap cloth to the size I wanted my mass of moss to be. Using a hot glue gun I tacked the burlap to the top of the wall. After adding more glue to the burlap I pressed small batches of moss into place with a metal palette knife.

Monday, August 17, 2009

Skull Island Wall Update

In the original King Kong film the Skull Island wall has an ornamental carving over both the village and jungle sides of the gates. To recreate this for the miniature wall I rolled out a section of Super Sculpey polymer clay.

I then carved the design into the clay. After texturing the clay and adding some cracks I made a one piece latex rubber mold. From this mold I was able to cast two identical plaques.

Here is a photo of the finished plaque mounted on the wall.

Sunday, August 16, 2009

Painting The Miniature Skull Island Wall

Eric Kessler the filmmaker that had designed the six foot long wooden wall had cut it in half to make transporting it to my studio easier.

A fact I was thankful for when it came time to lug it outside to spray it with grey auto body primer.

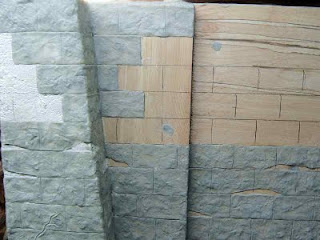
After priming it I dry brushed several acrylic colors over the entire wall to make the stone texture stand out. Next I mixed up a thinned down mixture of acrylic paints to make a wash. Using a soft brush I applied this over the stone and wiped off the excess with a rag. The wash settled in the cracks and crevices giving an antiquated look to the wall.

Saturday, August 15, 2009

Skull Island Wall Construction Update

After casting the four ornamental cornerstones in Polytranspar liquid cast I moved on to working on the right and left sections of staircase on each side of the wooden gate.

A thin layer of Apoxie Sculpt clay was applied to the wood staircase. The area where the cornerstones would be installed was left bare wood.

When the stone work was finished on the staircases I used Zap a Gap instant glue to attach the cornerstones. I added more Apoxie Sculpt clay around the cornerstone to help blend it in with the rest of the stonework.

When everything had cured overnight I took the staircase outside and base coated it with grey auto body primer.

Friday, August 14, 2009

Skull Island Wall Cornerstone

While sections of the stone work on the wall itself was curing I turned my attention to the ornamental cornerstones.

The staircases to the right and left sides of the wooden gate each have a pair of cornerstones. I began by making a wood frame to sculpt my cornerstone on.

The wooden frame was notched out to fit over the staircase steps. This way as the sculpting progressed I could test fit my cornerstone exactly where it would later be mounted.

Using Super Sculpey I modeled my cornerstone. I textured it and added a few cracks then smoothed down any rough areas with a stiff brush dipped in 91% alcohol. Since I would be needing multiple cornerstones I decided to make a latex mold of my original model and cast the four pieces.

Thursday, August 13, 2009

Beginning Work On The Skull Island Wall

Using a ruler I penciled in the location of the stones on the plywood. Mixing up a small amount of Apoxie Sculpt clay I began applying it to the wall.

After I had a thin veneer of clay in place I began to texture it with wood tools and rubber stamps I created to give it a stone like look.

I had about an hours time before the clay had cured to a point that wouldn't allow further tooling. I would then mix up more clay and start another row of stones. It was slow going but I think the results were worth it. The stones appeared realistic and no two were exactly alike.

Wednesday, August 12, 2009

Working On The Gong For The Skull Island Wall

The original gong platform was cut out of plywood and was painted to give it a rock like appearance. It needed to be built up. First I hot glued pieces of styrofoam board over the plywood.

Using Apoxie Sculpt clay I covered the plywood section from which the gong hung. The clay was textured to look like rough wood. I left the clay to cure overnight.

The next morning I used a rasp to shape the styrofoam to resemble stone blocks.Starting at the top I began covering the blocks in Apoxie Sculpt clay and tooling it to give it the look of aged stone.

Monday, August 10, 2009

Skull Island Gate Update

After my one piece latex mold had cured I needed to make a mother mold. A mother mold is an outer rigid shell that prevents distortion of the flexible latex mold. In this case I used Apoxie Sculpt clay to make my two piece mother mold.

I brushed Vaseline over my latex mold and the tile it was mounted on. Then I pressed the Apoxie clay over one side of the mold. When the clay had cured I brushed Vaseline over the edge of the mother mold and mixed up another batch of Apoxie clay. I covered the second half of the latex mold and firmly pressed the Apoxie clay in place. The next day I popped the mother mold open.

I turned the latex mold inside out and cleaned out any debris. Then I sprayed mold release over the inside surface. I set the latex mold inside my mother mold and clamped the two halves together. Slowly I poured in my casting material. After pouring the mold a second time I had identical castings of the catches that the bolt of the gate would slide through. This photo shows how the finished catches looked mounted on the gate.

Sunday, August 9, 2009

Making the Gate Slides

I made a cardboard template of the catch of the door the bolt slides through. After tracing the outline on a block of balsa wood I cut out the catch.

After painting the wood with acrylics to fill the grain I sealed the wood with varnish. Next I hot glued the wooden catch to a piece of glazed tile. I brushed on a thin coat of Vaseline as a separator and began applying liquid latex to make a one piece mold.

Here is a photo of the mold and original wood catch.

Saturday, August 8, 2009

Working on the Gates

To make working on the gates easier I first removed them from the wall. After studying screen grabs from King Kong (1933) provided to me by Eric Kessler I decided to add two crossbeams to each side of the gates.

I used wood glue on the crossbeams and clamped them in position. The next day when the glue had dried I removed the clamps and drilled holes in the crossbeams to accept short pieces of hardwood dowel.When I finished adding the dowels I painted the gates with brown acrylic paint.

Thursday, August 6, 2009

The Skull Island Wall in Miniature

I recently had the opportunity to recreate the look of the gates and wall of Skull Island from the classic film King Kong (1933).

Film maker Eric Kessler had made the wall out of plywood. Now he wanted me to give it a stone like appearance.

I knew from our conversation that the wall was 6 feet long. But when he arrived at my studio with his wall in tow it took over my work space! Here is a photo of the wall and gate before work began on it.

Wednesday, August 5, 2009

The Completed Styracosaurus Sculpture

Working on the Styracosaurus was enjoyable. It was an interesting challenge to sculpt something that had to have movable parts for stop motion animation. Eric Kessler has since completed filming the sequence where the raptors are feeding on the dead Styracosaur.

He was kind enough to give me a sneak preview and the scene came out great! It isn't often I get to see one of my creations come to life in a film. What made it even more exciting for a Kong fan like me was it is featured in a stop motion King Kong film.

If you haven't seen any of Kessler's animation of Kong and the other inhabitants of Skull Island you should check out his work on Youtube. Here is a link to one of my favorite clips:YouTube - Kong vs. Pack of Raptors

Monday, August 3, 2009

Painting the Styracosaurus Sculpture

Making a base to display the Styracosaur.Using Apoxie Sculpt clay I textured the edge of a wood base to look rock like.

Next I mixed ground cover with a 50/50 mixture of water and Elmer's Glue to coat the base. While it was still moist I worked some moss here and there to add some color.

When it came to painting the Styracosaur I used paints from WASCO -- Wildlife Artist Supply Company and my Iwata HP-BC airbrush. Once I had the general coloration and markings laid out I clear coated my work with Testor's Dull Cote to protect it.

When that dried I used pastel chalks on the horns and also sprayed them with Dull Cote. The next day I mixed up some thinned down acrylic paints with blending medium to make a dark brown wash. I brushed this over the entire dinosaur and wiped off the wash to accent the scale work and tie all my colors together.

Sunday, August 2, 2009

Sculpting the Styracosaurs Body

Once I had the head and legs added to the armature I began to sculpt the dinosaurs body in Aves Apoxie Sculpt clay.

Since the neck and jaw were going to be manipulated for stop motion animation I installed a stop nut in the side of the body. This would enable the Styracosaur to be tightened down onto the set and prevent unwanted jiggling during animation.

When I had finished the sculpting I gave the dinosaur several light coats of grey automobile primer. I then built up the sections of jaw and neck which would be animated with foam rubber.

Saturday, August 1, 2009

A Tongue for the Styracosaurus

In his film Kessler wanted the downed Styracosaur to have its tongue ripped out by attacking raptors. This would require a flexible tongue, jaw and neck area.

I began by sculpting the tongue out of Super Sculpey polymer clay. Next I made a two piece Plaster of Paris mold of the tongue. Several days later when the plaster had dried I was ready to cast the flexible tongue.

I chose latex from the Monster Makers . They carry a high quality latex used for mask making. I mixed a small amount of latex with acrylic paint till I had a suitable fleshy tone. I brushed two light coats of this latex/paint mixture inside my mold. When it dried I clamped my mold halves together and carefully inserted a braided section of aluminum wire down the center. I then filled the rest of the mold with pure untinted latex. When the latex dried a few days later I had my flexible tongue.

The Styracosaur Gets Some Legs

Using Apoxie Sculpt clay I began building up the front and rear legs of the dinosaur. The claws were made of Super Sculpey polymer clay which had been baked before they were added to the toes.

The look of the Styracosaurs scaly skin was achieved by pouncing a piece of textured latex over the clay while it was still soft.